It's 19 degrees outside right now. I need a hearty food to keep me warm while I am working. Thinking, comfort food, hmmm, Fried Chicken? But also wanting soup, and crusty sourdough bread. So I hatched a plan to put them together, and that is what this is...
Fried Chicken Noodle Soup is just that, Fried Chicken combined with Chicken Noodle Soup. The Sourdough Bread is something I have been working on lately. I've been improving my Pizza Doh processes to make a better Sourdough taste. Then also there are the Chincharrones con Pollo, the crispy strips of Chicken skin used as a soup cracker, like fried Wontons, but Fried Chicken. Uhhh...
Start with a one pound package of Chicken Thighs, bone in, skin on. Just regular Chicken. I use Tony Chachere's and Black Pepper to season , and flavor the Chicken. You can use any spice mix you like for Chicken, but avoid using mixes with sugar, which will burn during the frying process.
I am going to fry these Chickens in one tablespoon of Pork Fat. You don't need a lot of fat to fry something. You only need enough to boil off the water, and maintain a dry cooking process. Oil is a liquid, but it is not wet. Water is wet, oil is dry. With an oil frying process most of the water is immediately evaporated, and the result is dryer, more concentrated flavors.
Heat the pan, and oil until they are hot, but not smoking hot. The oil will ripple when its hot. Then place the Chicken in the pan skin side down. Let them go, untouched, for ten minutes. This is the part where we are making the nice crispy skin.
Next flip the Chicken over to brown the other side for another ten minutes. You can see the nicely browned skin now. That is what will become the Chincharrone con Pollo, or Fried Chicken Soup Cracker, mmmm.
To finish the Fried Chicken, in the oven safe pan, into the oven to let it cook through for another twenty minutes at 375F. This will let the heat get down to the bones of the Chicken. It is also melting the Chicken Fat, and making what is called Schmaltz, AKA melted Chicken Fat. We'll use the Schmaltz to make the Roux for the Soup.
Classic Chicken Noodle Soup requires Mir Poix, which is Carrot, Celery, and Onion small diced. This is Classic French Cooking, and the Mir Poix is a staple vegetable mix. I'm only making a couple cups of Soup, so I'll only use one Carrot, two Celery heart stalks, and the end of a Mayan Sweet Onion.
The Chicken is done now, and the Sourdough Bread is in the proofing box. Remove the Chicken from the pan to let it rest on a plate. What is left in the pan is called the Fond. The Fond is a mixture of the Pork Fat used for the Frying Process, the Schmaltz which melted away from the Chicken, small bits of the spice mixture, and Chicken bits that are left in the pan. The Fond is a very flavorful mixture, and we'll use it to make the base of the Soup.
The Mir Poix is now diced, and the Chicken is resting. Time to start the Soup.
There is more fat in the pan than we need so I remove the fat while trying not to remove the solids. I need a couple tablespoons of fat left in the pan to saute the Mir Poix, and then build the Roux.
The Mir Poix goes into the Fond to saute over medium low heat. We don't want to fry the vegetables. This is also hydrating the Spice, and Chicken bits that are left in the Fond, expanding the flavor. This is where real soup is different that those quick soups. The fat is used, and combined with flour to make the Roux. They call it Soup Base for a reason. The Fond makes it real soup.
While the Mir Poix is sauteing, add the seasoning , and flavoring. I added Sea Salt, Black Pepper, and dried Oregano. Again, the seasoning, and flavoring are a matter of taste, and you can add what you like. Then I added about two tablespoons of flour to transform the Fond into a Roux. The flour will soak up the fat, and together they will thicken the soup base. This is the solid hearty soup base I needed for the cold day...
I added two cups of Chicken Stock, and let the mixture come up to a simmer. As the mixture begins simmering it will start to thicken. If the mixture gets too thick, add a little water to thin it out.
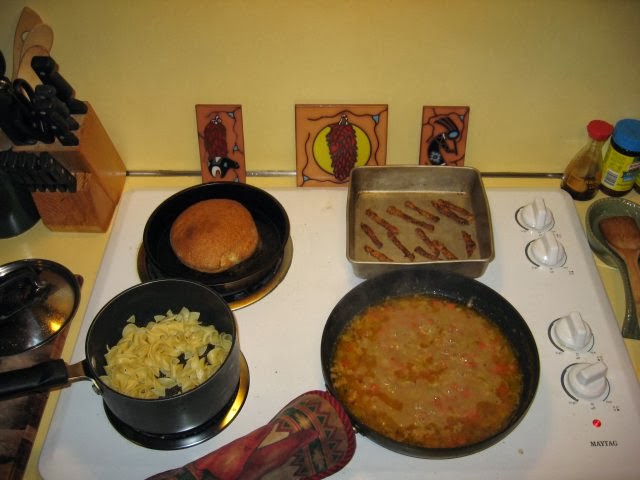
OK, back to the Chicken. I removed the skins from the Chicken, sliced them into strips, and put them in a baking pan to finish them. The Chicken meat gets pulled off the bone, and roughly diced for the Soup. The Chincharrone con Pollo get baked in the oven for another five minutes to crisp them up.
The Sourdough is done cooking. I prepared about 1.5 dry cups of Egg Noodles for the Soup, they just finished. The Chincharrone con Pollo just came out of the oven. Time to Assemble the Fried Chicken Noodle Soup.
Noodles go into the Soup.
Chicken goes into the Soup.
Mix well, add to bowl. Chincharrone con Pollo on the side, with crusty sourdough bread...


