Monday, July 18, 2011

Macaroni and Cheeze

Of all the things that I have cooked I have never had as much trouble perfecting something as I have had with Macaroni and Cheeze.  I'm not talking about that damn blue box either.  Macaroni and Cheeze is ubiquitous, its everywhere.  It seems that it would be easy to master if it is so popular.  I have found that there are subtle nuances to making the Mornay sauce, which is the Cheeze part of Macaroni and Cheeze.

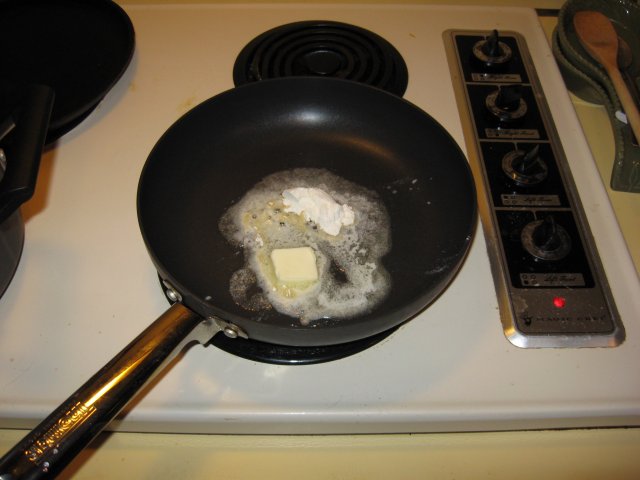
Maybe we should take a couple of steps back first.  Before you can make the Mornay Sauce, you have to make a Bechemel Sauce.  And, before you make a Bechemel Sauce you have to make a Roux.  Yes, the Crux of Macaroni and Cheeze is a Roux.  Seems pretty simple, right, flour and butter in equal parts, in this case 1 tablespoon of each.  This is a non-stick skillet over 35% power, 1/3 full.
This is so simple, how could it get screwed up?  Believe me, there is a delicate art to making a Bechemel Sauce.  When you don't know the subtle nuances, there are many things that can happen.  Bechemel Sauce is a Mother Sauce.  It gets turned into all kinds of other things, like Country Gravy, a staple in Texas.  So, any using the right tools is paramount.  The tool of choice here is a small whisk.
The whisk is the tool of choice because of the physical properties of the wires.  When these wires move through a liquid they create vortexes.  The pressure drop on the trailing edge of the wires causes a condition known as cavitation.  In certain situations cavitation is bad, like when it happens to the propeller on a boat, the cavitating water literally breaks the steel propeller.  The pressure drop from the cavitation is stronger than the atomic forces that hold the steel propeller together.  When making a Roux, cavitation is good.  The pressure drop causes the flour and liquified butter to slam together.  This does two things, it separates the flour granules, and coats them with butter.  This is the key to a Roux, the flour and butter need to be mixed very thoroughly, and every granule of flour needs to be coated completely with the butter.
The Roux needs to cook for a minute or two.  Take this time to heat a cup of milk in the microwave.  I use 2% milkfat, but you could use anything from cream to skim milk.  I heat the milk until it is about 180 degrees Fahrenheit, scalding hot, not boiling.  This is when the Roux becomes a Bechemel Sauce.  First give the Roux some Black Pepper, and a pinch of Sea Salt.  Then add the milk slowly, whisking constantly.  As the Roux starts to accept the milk it will become pasty.  Keep adding the milk and whisking.  As the Roux becomes more hydrated it will start to thin out.  Stop adding milk when the mixture seems too thin.  As the Bechemel cooks it will tighten up, you may need to add more milk if it seems too tight.  This is one of the subtle nuances, you kind of have to feel it out.  Once you feel the sauce is the right consistency reduce the heat to low and prepare for Cheeze.
For this particular batch of Macaroni and Cheeze I am using a mixture of Sharp White Cheddar, and Sharp Yellow Cheddar.  But you can use many other cheezes.  If you added Queso Quesadilla then this Mornay could become Queso Dip.  If you added Parmesan and Romano with some Fettuccine then you would have Creamy Fettuccine Alfredo.  If you were to add Gruyere and no pasta this could be a Fondue.  You could leave out the Cheeze and serve the Bechemel with some breakfast sausage bits over biscuits, for Biscuits and Country Gravy.  Bechemel is a very versatile sauce.  So, back to the Cheeze, I don't usually measure the Cheeze.  I add Cheeze until the Mornay has the necessary Cheezyness.  I do this with taste and appearance.  The Mornay Sauce will develop a stringyness, and you should be able to taste the Cheeze prominently.  Adjust the seasoning at this point.  I like Red Chile in my Macaroni and Cheeze, but then again, I like Red Chile on everything.
Typically Macaroni and Cheeze is made with plain old elbow pasta.  I don't have anything against elbow pasta, I use it a lot.  But, this time I am using Quinoa Spaghetti.  I have been using Quinoa Pasta a lot lately, but you can substitute many different pastas.  Some people put Bechemel in their Lasagne, why not add some Parmesan Romano Mornay Sauce instead?  Or you can use other foods like vegetables, use the Mornay Sauce as a creamy topping for steamed Broccoli and Cauliflower.  Mornay Sauce is also snack food.  Instead of adding pasta, saute some diced Jalapenos, Onions, and Tomatoes, and make some Nacho Cheeze Dip, one of my favorites.  In this case I am serving with thick piece of Artisan Sourdough which has been griddled and a cup of Bolita Beans.
Once I got the Roux figured out I still had a lot of experimenting to do.  I had problems with too much seasoning.  Too salty and too spicy do not make a good Mornay.  Mornay Sauce stands pretty good on its own, and doesn't need a lot of seasoning.  Don't put Habaneros in the Mornay Sauce.  I like them, but everyone else says WTF is this?  I'm pretty much not allowed to use Chile in anything for family consumption.  That's OK, more for me...

Sunday, July 17, 2011

Fish Tacos

Seriously craving Fish Tacos today...

Usually the fish is battered and deep fried.    I didn't feel like getting the deep fryer out, and I made skillet fried fish instead.  The breading is mostly cornmeal, with a little bread flour, Tony Chachere's More Spice, and fresh cracked Black Pepper.  The More Spice is a hotter version of Tony Chachere's.  Then mixed the dry stuff together.
Next we prepare the fish.  These are frozen Tilapia filets, and one Cod filet.
Made planks from the filets, and seasoned with more Tony Chachere's and Black Pepper.
Then dredge the fish in the breading and let it hang out in the breading until we are ready to fry.
 In the meantime I made the Chipotle sauce.  Usually it is Chipotle Ailoi, which is Chipotle flavored Mayonnaise, which is like 90% fat.  Instead, I am going to use my Yogurt Ranch dressing, which is the house dressing.  It is 2 cups of sour cream, 1 cup of yogurt, and a Ranch Dip packet.  Then to make it Chipotle I add one finely chopped Chipotle, and about a teaspoon of the Adobo to a half cup of Yogurt.  I'm using San Marcos brand Chipotles in Adobo Sauce.
So, the sauce is ready, the fish is breaded, now gotta get the tortillas ready.  I use a Cast Iron Griddle as a Comal.  Each tortilla gets to ride on the Comal for a minute or so, equal time on each side.  I warm the tortillas as I am frying the fish.  The fish will fry in a large skillet over medium heat, with a few tablespoons of vegetable oil.  They only take a couple minutes per side when they are small filets like these.  Also need to shred some lettuce in there at the last second.  As food starts coming of the cooktop I assemble the Fish Tacos right on the plate.  I gotta have some Cayenne Chile sauce, always.  Then also have a cup of Bolita Beans from yesterday....
So this is may Cajun/Texan variation of Fish Tacos.
The went together faster than I thought they would.
They are definitely something I'll make again...

Tuesday, July 5, 2011

UABMM2 Final Assembly

The UABMM2 is the Uniform Asynchronous Bucking Magnet Motor 2.  I am getting close to getting the assembly finished.  This is my second attempt at building a self-sustaining magnet motor.  The first had clearances that were too great, and the cants (angles of the magnets) were too extreme.  So I took what I learned from the first attempt and made an improved magnet motor.  Here are the Stator and Rotor plates rough cut.
I use my Mini Mill to make the rough cuts using a 1/8th inch End Mill.  Then I need to cleanup all the "scallops" that are left over from the milling process.  This helps me to get tight clearances.  I cut wide by 5 to 10 mils, and then grind the cants into tolerance.  With the magnets installed I have about 50 mils clearance on each side of the rotor.  Here are some shots of the cleanup process.

After I get all the cants cleaned up I'll need to drill a hole, and tap the hole for each cant.  The magnets have a #6 countersunk screw hole so they can be mounted.  There are 40 cants on the Stator, and 36 cants on the rotor.  Here's a shot of the rotor, and stator after they were cleaned up.

These few pictures represent several days of work.  These parts are handcrafted and that equates to a lot of work.  My hands were very tired after this, and I hope it is worth it.  After all the cants are drilled, and tapped then we can start installing the magnets.  I started with the stator.  The magnets are installed with the North side facing inwards.  When all the magnets are installed then the stator will form a quantum singularity.  Or, in other words all the North Poles are facing inwards, so we have a N-Field within the stator ring.


The populated stator forms a quantum singularity, or N-Field within the stator ring which is a race (read like bearing, or track) that the rotor rides on.  The rotor magnets have their North Poles pointed out, repelling the stator ring.  The rotor magnets are also slightly tilted relative to the stator magnets to put this system out of balance enough to cause the rotor to turn.  Here is a shot of the rotor in place after the stator magnets have been installed.
I am starting to assembly the rotor now, but ran out of magnets.  So, I need to get some more on order so I can finish this, and get into testing.

Victory Garden Chicken Chop Suey

My little vegetable garden is what Eleanor Roosevelt would call a "Victory Garden".  Back in the 1940's and 50's they were very popular and hardly anyone grows their own food anymore.  Well, I enjoy it even if its not very popular.  Of course my favorite part is eating what comes out of the garden.  Uh, that's Dusty's favorite part too.  Here are some Turnips we harvested July 4, 2011.
Here is a Kohlrabi, its in the Cabbage Family, and is a Cruciferous Vegetable.
I stir fried Onions, Celery, Cabbage, Kohlrabi, and Turnips to make a vegetable base for my Chop Suey.  I sliced the vegetables into thin strips, like matchsticks, to expedite the cooking process.  Then I used a slurry of cornstarch, Chicken bullion, and water to make the Chicken flavor sauce.  Then I season the sauce with Soy Sauce, and Sesame Oil.
The very last addition is some of my Hickory Smoked Chicken, which is only in the pan long enough to get warm.  When you are using ingredients that are precooked add them at the very end of the process to avoid overcooking them.  Chop Suey is traditionally prepared with Rice, but I want a more diverse nutrient base, so I am serving mine with some 15 Grain Garlic Toast.
Of course I always have to have a little heat at least so, you can see the bottle of Cayenne Chile Sauce there.  Some sort of Chile goes into everything I eat.

Spring Harvest 2011

Forth of July Weekend 2011.  Time to harvest the veggies that can't take the heat of July.  The Potato plants dried up around the end of June, and the Onions were starting to fall over and dry up, so I needed to pull all of them.  When it gets really hot outside in the summer the cooler weather plants will go dormant.  To protect them from the heat I'll store them in brown paper bags in the pantry.  Then when fall arrives I'll plant the Potatoes and Onions again, for a second crop this year...
The bed that is left over will get more organic compost, and get tilled thoroughly to prepare for the fall planting,  You can see some Heirloom Tomatoes, and Cayenne chile pots in the background...
Here is a view of the rest of the North Garden.  There are a number of plants that are near harvest.  Some of the Kohlrabi, Beets, Turnips, Carrots, and Chiles are becoming ready to harvest.  I have already tried a few.
This one is Purple Sage.  Tastes the same as regular Sage, but its purple when its young.
One of my personal favorites is Siam Queen Thai Basil.  I use it in Pho and Salads...
The Blossoming Curry Plant is a Southwestern looking plant.
I grow ornamentals also, here is some Dwarf Ruellias which grew out of the sidewalk next to some Quinoa.  I've noticed that some of the Quinoa Plants flowered and produced seed in the spring, and then went dormant.  While others like these didn't flower, produce seeds, or die back when it got hot outside.
The Trumpet Vine is a long term project.  I have had to rebuild the trellis several times because the Trumpet Vine has become very large and heavy.  But, the pay back is a plethora of Orange Trumpets.
Here is the North Garden from the opposite view.
Dusty helps a lot in the garden.  Here she is helping harvest some Turnips.
But I pay the price for the help.  When I am not looking she eats my green Tomatoes.  Its funny how I can have these beautiful Tomato Plants, and there is not one Tomato on them.  Apparently she has a taste for hard green Tomatoes.  For my Fall crop I will be erecting a fence around the Tomatoes...