
Monday, November 28, 2011
Ale Pizza Doh
The idea to use Ale to make Pizza Doh wasn't too bad. I could probably work with this a little more, and make it better. I made the basic Doh with 12 ounces of Ale instead of Water. It is certainly more yeasty. It rises more while cooking. The basic recipe is 12 ounces of Ale, 2 teaspoons of Sea Salt, 2 teaspoons of granulated Sugar, 2 teaspoons of bread machine Yeast, and 4 tablespoons of Olive Oil. Combine all the ingredients in the Stand Mixer bowl, and knead with a Doh Hook for 10 minutes. After kneading oil the Doh Ball, and place in a oiled bowl to proof for an hour at room temperature, or place in the refrigerator to be used within a few day. I put mine in the fridge for a day before I used it, and the Doh doubled in size...
 I didn't get any finished shots of this Doh. I had peeps over, and was busy making pizzas and stuffz...

Thanksgiving Practice
Before Thanksgiving I need a little practice to get back into the traditional cooking mode. Its one of those times where my Tex-Asian fusion cooking just doesn't go over well. Like the time I made a Chile Crusted Pork Loin instead of a Turkey, I found out just how many Gringos were in the family. So, for my warm up Thanksgiving Practice Dinner I made a Roasted Chicken, with Cornbread Stuffing, and Mushroom Pan Gravy. On the practice dinner I get to use Chiles, but not on the Thanksgiving meal.
 The butterflied Chicken is seasoned with Tony Chachere's Season Salt, and fresh cracked Black Pepper. Then its roasted in the oven at 400 degrees Fahrenheit for an hour. While its roasting I'll put together the Cornbread Stuffing. I'll make a small batch of Cornbread, bake it off, and let it cool. Then crumble the Cornbread so I can mix it with the rest of the ingredients. The recipe I made equates to about half of the original recipe. Then I took some Pane Toscana, about 3 thick slices, and cubed them. Combine with the Cornbread crumbles in a large bowl. I saute some diced Onion, Celery, Garlic, Jalapeno, and Cayenne, then add them to the crumbles and bread. Then add salt, pepper, 1 cup of chicken stock, and half a cup of milk, mixing thoroughly. Dump the mixture into a 9" x 13" Pyrex baking dish, smooth it out, and bake it for 30 minutes at 400 degrees Fahrenheit.
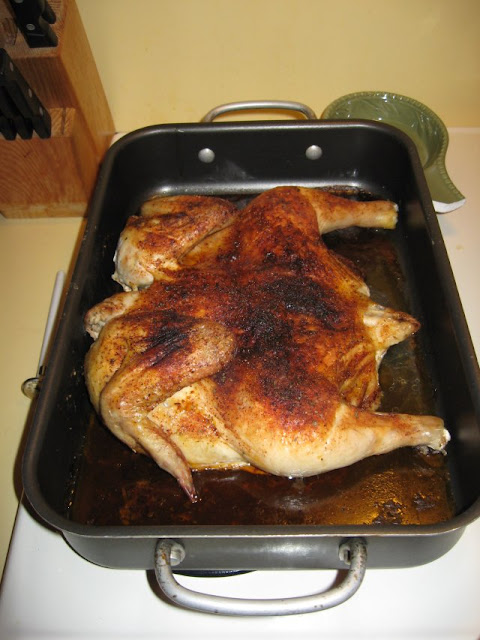 When the Chicken is done roasting we scavenge the pan drippings to make the Mushroom Gravy. The Chicken goes to a plate to rest, and the pan dripping will go into a sauce pan. I will saute the sliced Mushrooms in the sauce pan first. Then pull out the Mushrooms to make the gravy. Add the Chicken Fond to the sauce pan, and then add about a tablespoon of flour to the Chicken Fond. Whisk the slurry together thoroughly over medium heat. As it thickens add some Chicken stock and continue whisking. Keep adding Chicken Stock a little at a time, and whisking, until you reach the target consistency. Reduce the the heat to low, and add the Mushrooms back into the gravy. Now its time to assemble the dinner.
 To me, this is what a Thanksgiving dinner should be, coordinated, and matching. Pot Luck Thanksgivings are not what it is supposed to be. The meal should be planned, work together, and not be a Smorgasbord. Poultry, Stuffing and Gravy is the prefect mix for Thanksgiving...


Monday, November 14, 2011
UABMM2 New Mount
Back in the Metal Shop on 11/11/11.
Taking all that funky numeric synchronicity and
channeling it into metal working...
So at 11:11 AM on 11/11/11 I was shredding metal...
\m/___(O.o)___\m/


Taking all that funky numeric synchronicity and
channeling it into metal working...
So at 11:11 AM on 11/11/11 I was shredding metal...
\m/___(O.o)___\m/


Sausage, Biscuits, and Gravy
I can't deny my country boy roots. Sausage, Biscuits, and Gravy is one of those things I just gotta have every once in a while. On the weekends, I prep cook sausage for my breakfast burritos . The pork fat that renders out of the sausage is perfect for the roux in the gravy. I do this so often that I really don't need to measure things now. I breakdown the sausage into small chunks in the pan while it is cooking. When all the sausage is brown I remove the sausage from the pan using a slotted spoon, leaving the pork fat in the pan. Then add enough flour to equal the pork fat, and whisk it together thoroughly. When you know what a roux is supposed to be like then it is easy enough to add flour until the consistency is right. If you accidentally add too much flour, you can always balance the roux by adding a little more pork fat.
The roux needs to cook for a while, over medium heat. As it cooks the flour will become more brown, and we don't want it too brown for a country gravy. So, cook the roux for about three to five minutes. Then add the milk, a little at a time, whisk it in thoroughly, and allow it to come to a boil before adding more milk. As the gravy comes to a boil it will thicken. If it starts getting too think, add some more milk, and whisk it in thoroughly. Add a little salt and freshly ground black pepper. At the point where the gravy seems to be the perfect consistency, then reduce the heat to low, and let simmer a little while longer. Let the gravy simmer for a final five minutes, while assembling the rest of the stuffz. Right before serving, check the thickness of the gravy one more time, and add a little more milk if it seems too thick.
For this one I have split two biscuits in half. You don't need to add butter to the biscuits because the country gravy is the substitute. Then I'll add some of the sausage crumbles on top of the biscuits. Spoon the gravy over the biscuits, and add some scrambled eggs in the middle there. Add another grind of black pepper on top, and a little season salt, and there you go...
Breakfast fit for a King...

The roux needs to cook for a while, over medium heat. As it cooks the flour will become more brown, and we don't want it too brown for a country gravy. So, cook the roux for about three to five minutes. Then add the milk, a little at a time, whisk it in thoroughly, and allow it to come to a boil before adding more milk. As the gravy comes to a boil it will thicken. If it starts getting too think, add some more milk, and whisk it in thoroughly. Add a little salt and freshly ground black pepper. At the point where the gravy seems to be the perfect consistency, then reduce the heat to low, and let simmer a little while longer. Let the gravy simmer for a final five minutes, while assembling the rest of the stuffz. Right before serving, check the thickness of the gravy one more time, and add a little more milk if it seems too thick.
For this one I have split two biscuits in half. You don't need to add butter to the biscuits because the country gravy is the substitute. Then I'll add some of the sausage crumbles on top of the biscuits. Spoon the gravy over the biscuits, and add some scrambled eggs in the middle there. Add another grind of black pepper on top, and a little season salt, and there you go...
Breakfast fit for a King...

Wisconsin Nachos
Every year around the holidays I crave Kaukauna Port Wine Cheese and Triscuit Crackers. Its one of those quintessential holiday things, probably why that stuff is so expensive. So, like everything, I have to put some Chiles on them. Take a Triscuit cracker, spread some cheese on it, then a slice of pickled Jalapeno, and thus the Wisconsin Nacho. Those are home grown and home pickled Jalapenos. I wonder if they make a Red Chile Kaukauna cheese?


Monday, November 7, 2011
UABMM2 New Mount
After the disappointing test of the UABMM2 last week I was ready to stop working on it. A large amount of work and money had been expended on it, and there were no results to be had. So after a few days of being disappointed I realized that the potential of this device is great, and this was really a small set back. So I began gathering materials to build a new, stronger mounting system for the UABMM2. The shaft needed to be much stronger, but also the way that the rotor mounts to the shaft needs to be much stronger. Here is a shot of the new materials.
 I am doubling the size of the shaft, from 1/4 inch to 1/2 inch. Then we'll need 1/2 inch bearings, and new bearing mounting plates. The hardware to hold the rotor was a bit of a puzzle at first, but after some research I found a split taper bushing. A split taper bushing is designed to hold a pulley, sheave, or sprocket to a shaft. Its a hefty chunk of metal that has a precise hole in it for the shaft and then a couple of grade 8 screws to hold the rotor to the bushing.
 For the bearing mounting plate I used another couple of AMS4051, or 6061 Aluminum, 1/4 inch plates, the same plate that is used to fabricate the UABMM2 rotor, and stator. They are high tensile strength, and are also fairly easy to machine. Both plates will be identical, so I can machine them concurrently, which will also let them be identical after they are machined. I had marked up the plates a couple of days ago, and got them on the Mini-Mill last night. In this pic I am spotting the holes using a 1/4 inch, 90 point, M42 Cobalt spotting mill.
 When I am spotting I clamp a fence to the machine table to help get everything square. Then I use the cam action table clamps to hold the plates to the table. I am using the same sacrificial block that I had used on the UABMM2 plates so the holes will line up when I assemble the stack. After spotting I bored out the holes to 1/2 inch with the step drill. Then I am using the sacrificial block to hold the stack together while I machine the shapes into the plates. So I needed to countersink the holes in the corners on the back of the sacrificial block to accept the grade 8, 1/2 inch, countersunk machine screws that hold the stack together during the machining process.
 The pivot stud in the middle of the plate is jammed into the table so it won't move. It is the center of the radiused cuts, while the cam action table clamps keep everything tight during each individual cut. The alternative to doing this is getting a Rotary Table, which are pretty expensive. This is my low cost work around. Now the stack is assembled, and the table is set up to do the radiused cuts, and the next time I can get to the shop I am ready to start cutting the new bearing plates.
 I also got a piece of the 1/2 inch shaft cut, and fitted the split shaft bushing on to it. I need to machine a slot in the shaft for a 1/8 inch shaft key to lock the split taper bushing on to the shaft. So I made good progress yesterday in relatively little time. Can't wait to get back to the Metal Shop...


Deep Fried Fish Spring Roll
Feeling adventurous before the Cowboy game on Sunday, wanna make some delicious nom-noms for watching the game. I've had the idea of Fried Spring Rolls in my head for a week or so. Seems like a good idea. The filling for a spring roll is usually rice noodles, Bean sprouts, and seafood, but I am thinking more like an Egg Roll with a Rice paper wrapper. I think we'll use Cabbage, Carrot, and Onion for the vegetable part of the filling.
 I used the grater to shred the Carrot, then the Cabbage and Onion were finely sliced. Also later decided to put several cloves of Garlic in the filling as well.
 Then for the seafood I used Whiting, which is a pretty unremarkable fish, but its cheap, and I like it. I usually buy fish frozen, so I thawed out about a pound of Whiting.
 I've never attempted a Egg Roll, or a fried Spring Roll before, so just winging it here. I have some Asian cookbooks and did browse them before doing this, and sort of felt like I had a good idea of what to do. I wanted to precook everything that was going into the roll first, but not fully cook, and let the frying process finish off the cooking. So, I start by sweating the Onions, with some Red Chile flakes, and salt.
 Then I'll add the garlic. The strongest flavored foods hit the pan first, and then we'll add the bland foods, and they can pickup the Onion, Garlic, and Red Chile flavor.
 This is a Stir Fry process so it goes quickly. I have a Bamboo Wok Tools that I use to toss the pan's contents around. A lot of my cooking happens in a Stir Fry Pan, even non-Asian foods. I just love these pans, they are almost indestructible.
 Here we toss in the Carrot and Cabbage, and mix them together well. A Stir Fry Pan should be really hot, and you need to keep the contents moving. If you don't then the food on the bottom can over cook, and the food on the top can be undercooked.
 Then within a few minutes everything is to the target doneness. We'll take the vegetable filling and put it into a bowl to cool while we prepare the rest of the ingredients for the Spring Rolls.
 Chinese Mustard is something I like on Egg Rolls, but don't have any. So, I decided to fake it. Chinese Mustard is strong, and sweet, So my improvisational condiment will use Yellow Mustard, Honey, and Wasabi.
 This probably turned out to be the best part of what I made today. As you'll see soon, my grandiose dreams of homemade Deep Fried Fish Spring Rolls didn't turn out for the best.
 Next I poached the fish, so it would be partially cooked going into the Spring Rolls. I used some water in the Stir Fry pan, and let the fish have a nice warm bath before hitting the fryer.
 While the fish were poaching I prepared the deep fryer. I use vegetable oil in the fryer, and preheat it up to 350 degrees Fahrenheit. Next to the fryer, on the left, is a sheet pan with a rack to drain the Spring Rolls after they come out of the fryer.
 Now, on with preparing the Spring Rolls. We have all the filling ingredients precooked, and all we have to do is assemble them. I have a pan of hot water to soak each Rice paper wrapper for a few seconds first. Then I'll transfer them to the assembly station where I add some of the vegetable filling and a slice of fish. Then roll them up like an Egg Roll, Spring Roll, or a Burrito.
 The vegetable filling, and a pound of Whiting was enough to make 11 Spring Rolls. The rice paper will get sticky as it starts to dehydrate, so you gotta keep 'em separated.
 Unfortunately I don't have any pictures of the frying process. What happened next put my endeavor into a crisis mode, and I was busy trying to save my Spring Rolls, so I wasn't even thinking about the camera. The fryer was up to temperature, the Spring Rolls were ready, I got all of the unnecessary stuff out of the way, ready to go...
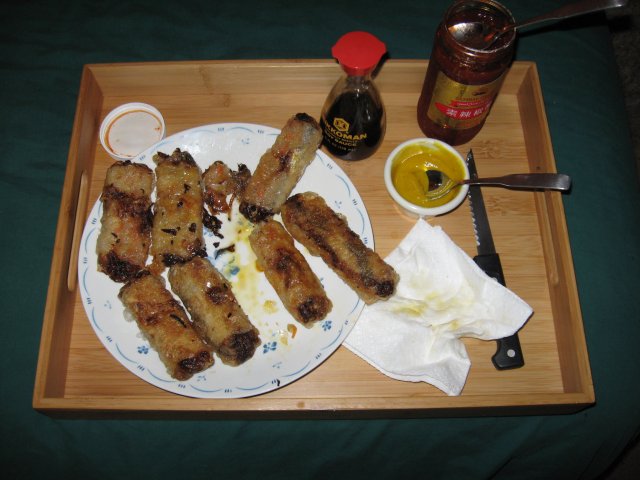
When the first two Spring Rolls hit the oil things went awry, Doh! The Rice paper is very elastic, and when the filling started to give off steam they puffed up like balloons. I'm thinking, OK, this is normal. The the Rice paper burst, and the contents of my Spring Rolls exploded into the oil, oh crap! So that was the first one, and I am thinking maybe I didn't roll it tight enough. After a couple more blowouts I was feeling pretty defeated, and the results were pretty ugly...
 So, after the initial failure, I went searching for answers, and consulted my Chinese cookbook. Their method of deep frying was just about a half inch of oil in the Stir Fry pan, and not a deep fryer. So I grabbed the Stir Fry pan, and got it fired up over medium heat, and transferred a cup and a half of hot oil from the deep fryer to the Stir Fry Pan. With this method the Spring Rolls were not totally immersed in the hot oil, so they didn't have the adverse reaction of puffing up and exploding. They did swell up a bit, but not like in the deep fryer. Well, this is a relief. The remainder of the Spring Rolls were salvageable, but my technique is still lacking...
 So, by this time I had missed the first half of the Cowboy game, and the kitchen looks like a hurricane had just came through it. Everything is coated with a fine layer of fryer oil, and I'm exhausted. So, I take my half-assed, oil saturated Spring Rolls, and went to watch the game...
 They weren't totally bad. The fish was overcooked, the vegetable filling was saturated with fryer oil, on some of them, and no didn't eat them all. The Honey, Mustard, Wasabi sauce was good. But I did get a crash course in making fried roll thingys, and wound up sleeping through the rest of the game. Well, at least the Cowboys won...


When the first two Spring Rolls hit the oil things went awry, Doh! The Rice paper is very elastic, and when the filling started to give off steam they puffed up like balloons. I'm thinking, OK, this is normal. The the Rice paper burst, and the contents of my Spring Rolls exploded into the oil, oh crap! So that was the first one, and I am thinking maybe I didn't roll it tight enough. After a couple more blowouts I was feeling pretty defeated, and the results were pretty ugly...


Subscribe to:
Posts (Atom)