Monday, October 31, 2011

Impromptu Soup

Hungry, need soup...

Lets just wing it here, soup on the fly.  This is what I do when I am scavenging the leftovers, and don't really feel like thinking, or making any sort of formal meal.  You might call it leftovers in a bowl, or maybe stone soup.  So, we'll start with a typical soup base.  Slice some onions and garlic, and throw the onions in the stir fry pan to saute with a pat of Butter and some Olive Oil
Gotta add some heat, so I'll chop a dry red Cayenne Chile and throw it into the stir fry pan.
  My herb du jour is Rosemary, so I'll fleece a sprig, chop it, and toss it into the stir fry pan as well.  I'll also add the Garlic at this point because you don't want the Garlic to fry too much, or it will get bitter.
This morning I had made the Pan Roasted Chicken, and there are some potatoes leftover from that project, so I'll toss some of those in as well.  This is exactly why I prep cook on the weekends, all the ingredients are fully cooked, and all I have to do is combine, and reheat them,
This is soup so I'll add two cups of the Chicken stock that I made with the Pan Roasted Chicken.  Then stir to loosen anything that stuck to the pan, and get everything coated with the Chicken stock.
While that is coming up to a boil, I'll go and get a leftover Chicken breast and cube up about a cup of Chicken chunks.  Then add that to the Impromptu Soup.  So, what do we have here so far?  Chicken Potato Soup?
I think I want some Rice in there as well, for nutritional diversity.  Chicken and Rice Soup is something I make a lot.  So I'll steam a cup over leftover Rice in the microwave, and dump it in the middle of the serving bowl.
After the Soup returns to a boil, I'll pour it over the Rice in the serving bowl.  In the meantime there I griddled a slice of Pane Toscano bread, which is an Artisan Bread from the La Brea Bakery.
So, altogether it took about 15 minutes to bring together a custom bowl of Impromptu Soup, that is way better than anything you could get out of a can.  Just what I needed after a lazy Sunday watching football...

Sunday, October 30, 2011

Pan Roasted Chicken

This is French Country cooking on the Texas Prairie...

I grew up watching Julia Child and Jacques Pepin on KERA, and if you know these Chefs then you also know that Roasted Chicken is a cornerstone staple of French cooking.  But its more than taking a Chicken and tossing it into a hot oven.  Its about bringing out the delicate flavors in the Chicken, and also utilizing the whole Chicken and not just the meat.  Perhaps my favorite part of the Chicken isn't the meat, it is the stock that is made from the leftover carcass.  So we will start with the vegetable base which the chicken rides on during the roasting process.  Here we have Carrots, Potatoes, Onions, and Celery.
Each of these vegetable brings their own flavor to the broth.  After the roasting process I'll add the Carrots, Celery, and Onion into the stock pot with the carcass.  The potatoes will get pulled out after the roasting process because they will thicken the stock, and I want a thin stock.  We will coarse chop the vegetables and put them in the roasting pan.
This has a double purpose.  The steam from these vegetables will travel up during the cooking process and season the Chicken and act as a standoff for the Chicken preventing it from sitting on the bottom of the pan.  The juices that flow out of the Chicken will accumulate on the bottom of the pan, and if the Chicken is allowed to sit in these juices then it will boil instead of roast.  A roasted Chicken is supposed to be roasted, and not boiled.  Next I'll season the vegetables with a small amount of salt and pepper.  Then add a few sprigs of Rosemary.
Now we'll set the roasting pan aside, and prepare the Chicken.  For this particular recipe I use a whole Chicken, about 4 to 5 pounds.  When you buy a whole Chicken you also get a neck, heart, liver, and gizzard.  I take the spare parts and place them in the pan with the vegetables.  Wash the Chicken with cold water, and place on a secured cutting board.
Next we'll butterfly the Chicken.  I do this for a couple reasons.  First I don't like the open void space inside the Chicken because it creates thermal conductivity problems.  The void space doesn't heat up the same as the space around the Chicken, so we'll eliminate it by butterflying the Chicken.  Second, when you butterfly the Chicken it fits the pan better, and reduces the vertical space required to get it in the oven.  When you have many things cooking at once this becomes important.  So, we'll start the butterfly process by cleaning the breast meat away from the keel bone, which is the Sternum.
Here you can see the keel bone exposed.  In the front of the Chicken, where the neck is attached you will also find the wishbone.  I feel around for the ends of the wishbone and pull it out of there before I cut out the keel bone with a kitchen shears.
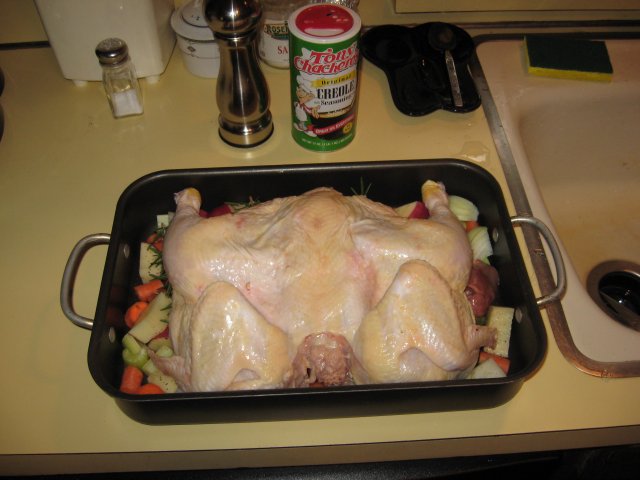
Now, with the keel bone removed we can flatten out the Chicken and get it seasoned.  The Chicken is still kind of lumpy at this point, and we want to flatten it as much as possible, again for vertical spacing, and also to widen it.  Take the Chicken and flip it over on the butterflied breast side, then press down on the hip area to dislocate the thigh bones.  Then press down on the upper back area to flatten the breast and rib bones.  Flip the Chicken over again, and season the bones side with whatever you like, but not too much salt, remember we are going to make broth with the vegetables and carcass.  I use Tony Chachere's Creole seasoning, and ground black pepper.
Time to add the Chicken to the pan.  Take the Chicken and flip it over again, skin side up, and place it on the vegetables in the pan.  Maneuver it in the pan to where it is centered as much as possible.  There are two things happening as the Chicken roasts, the steam from the vegetables is going up to the Chicken, and the drippings from the Chicken are going down on to the vegetables.  The symbiosis of this process is delicious. 
Now season the top side of the Chicken with the same thing you used to season the bone side.  I typically roast Chicken pieces in the oven at 425 degrees Fahrenheit, but for a whole Chicken and a pan full of vegetables I'm gonna bring the heat down to 375 degrees Fahrenheit.  This is to allow a slower roast to get more flavor mingling happening in there for the benefit of the broth later.
Typically it is going to take an hour and fifteen minutes to get the Chicken roasted to a safe temperature, but I do not rely on time to do this.  Cook the Chicken to temperature, which is 170 degrees Fahrenheit in the breast, or 185 degrees Fahrenheit in the thigh.  Make sure your temperature probe is in the middle of the meat, and not sitting on a bone.  Then after you reach your target temperature pull the pan out of the oven, do not remove the temperature probe, cover the pan with foil, and let the Chicken rest for 15 to 20 minutes.  There is plenty of heat in there, and it will not cool quickly, so don't get in a rush.
Another reason to let the Chicken sit, and cool for a while is I need to used my finger to disassemble the Chicken.  Doing that is not very fun when the Chicken is 170 degrees Fahrenheit.  So, next I'll take the meat off the bones, and pull the Potatoes out of the pan.  I like to keep the breast meat as one large piece, but the leg, thigh, and wing meat I take apart in "rustic" pieces, which are not too small.
As I am taking the Chicken apart I can't help nibbling on the Chicken.  The breast meat is moist and flavorful with a hint of Rosemary.  Every part is thoroughly cooked, but also moist, the way it should be.  By thoroughly cooked I mean that the juices from every part are clear, no red, and this is the classic way you are able to tell that the Chicken is cooked properly.  The Carrots, Onions, and Celery are left in the pan, along with the drippings from the chicken, the spare parts like the neck, heart, and gizzard.  These will go on to become the Chicken broth.
Then I also want to add the bones from the Chicken pieces that were used for meat, like the thighs, drumsticks, and wings.  Here is what I have harvested from the process so far, the meat, potatoes, and the liver.  The liver is done now, and can be eaten as it, though its not my favorite part, its good none the less.
This is the prep cooking that I do on weekends for the week.  This stuff will wind up in whatever I fancy during the week.  Chicken Tacos, Chicken soup, like Pho Ga, Hashbrowns, whateverz.  Then all the leftover bones, vegetables, organ meat, and the neck go into the stock pot to make the chicken broth.  I am also going to add some more fresh carrots, celery, another sprig of Rosemary, and a half gallon of spring water to the stock pot.

All those leftover bits are valuable, and its just wrong to throw them away.  I'll bring the stock up to a boil, then reduce the heat to a simmer, and simmer them down for a couple hours.  Its the most awesome soup stock you done ever had...
After the Chicken broth has simmered for a couple hours I'll taste it and adjust the seasoning if it needs it, but usually I leave the final seasoning adjustment for the table.  I'll use a colander and another stock pot to strain all the solids from the broth, let it cool to room temperature, put it in serving size containers, an then refrigerate it until needed.  The solids that are left over are spend, and can be thrown away now, knowing that we extracted every bit of nutrition from them.  Its always a good idea to use you resources fully, and wisely...
 After the stock is strained I put it in the auxiliary fridge to cool over night.  The schmaltz, chicken fat, will come to the top of the broth and solidify.  Then we can separate the schmaltz from the stock.  Chicken soup should not have a pool of fat floating on the top of it.  Then the remainder is the stock which can be used promptly in the soup.
This stock was very strong with Rosemary and vegetable flavors as well as the Chicken.  Some might prefer to have a more fundamental Chicken stock, or broth with their soup.

Bon Appetit, Y'all...

UABMM2 Test

OK, here I have all the magnets installed.  This thing is dangerous at this point.  There are literally hundreds of pounds of magnetic force on both the rotor and the stator.  They both hate each other and love each other in that in one position they want to go flying apart, and an inch away they want to slam together.  The rotor weighs less than a pound, but when it is stuck to a metal surface like the refrigerator it takes a major effort to get it loose...
So, when I get the rotor in place the magnets will push one side of the rotor down, and the other up.  The shaft arbor and the little quarter inch shaft are mere pawns to these forces and just bend.  Having a one sided mount was an epically bad idea.  When I physically force the rotor to sit level there are no rotational forces that I can detect.  Its just a more complex situation of the magnets finding a static balance point and sticking there, HARD.  I'm beyond melancholy now.  I still want to believe that this can work, but after so much work and expense, and no results I have to say this is a failed concept.
While I don't just want to give up on this concept, I am going to need to redesign the way the rotor is mounted on the shaft, the bearing placements, and the methodology of bringing the stator into proximity with the rotor.  I have an idea in my head.  First we need a much sturdier shaft, 1/2 inch, and the rotor need to be very solidly fixed on that shaft.  Then the stator would move on the outer support rods, 1/2 screws, and would be a spring loaded, nut actuated engagement system.  Then also the bearings would need to be extra heavy duty, and mounted n the ends of the shafts so the magnetic forces can't bend the shaft around at will.  Total redesign of the mounting system, the rotor and stator would remain the same.

The first picture here is the rotor in position, and the magnetic forces bending the shaft to the physical balance point.  Looks pretty sorry.  Then the second picture is the loose rotor levitating over the stator.  The axle is preventing movement in the X and Y axises, and the magnetic forces are causing the rotor to levitate in the Z axis.

I had also thought about taking the magnets and building something else, perhaps some new alternator, or a levitating toy.  Right now I think I'll just go and get a bowl of Pho, and a nap...

Saturday, October 29, 2011

DiaMag8 Test Platform

OK, got the rotor reworked.  I had to remove all the magnets from the rotor, cleaned off all the old epoxy, and then glue it back together with a better epoxy.


Here is a better video also...


I was kinda disappointed with the ease in which I was able to break the magnets loose from the rotor, and then remove the epoxy from the magnets and the rotor base.  Basically I used my hands and fingernails to take the rotor apart.  I needed to do what I could to increase the adhesion of the epoxy to the rotor base and the magnets.  Here I have chucked up the rotor on the drill press, and am using a coarse rasp to rough up the rotor.
Then I needed to reassemble the jig that I used to assemble the rotor in the first place.  Its a couple of 2x4s clamped to the bench, and I used a couple of cable clamps to hold the ends of the shaft.  This holds the rotor stationary, and put some tension on it so I can apply the epoxy and affix the magnets.
 After I cleaned up the magnets I get them lined up on the fridge in order to help in the application process.  They line up NSNSNSNS, and if you get them out of order they will let you know because they will not want to sit next to each other if you get like poles next to each other.
I am going to use an industrial grade marine epoxy this time.  It has a higher viscosity, and hopefully will have better adhesion.
I'll apply the epoxy evenly around the outside diameter of the rotor base, and tried to make sure that it is evenly applied.  Then place the magnets on the rotor.  Because of the way they are arranged they will hold themselves in place with the adhesion of the epoxy, and also the attraction of the magnets.
This epoxy dries in 50 minutes, but requires 24 hours to be fully cured.  So, I want to make sure, this time, that the epoxy is fully cured before I spin the rotor.  So, after the cure time I spun up the rotor and had no problems.  Here is a closer shot of the second rotor assembly...

Sunday, October 23, 2011

DiaMag8 Test Platform

Finally got the DiaMag8 Test Platform running, despite some problems that are still giving me some trouble.  Namely the power supply, and regulation were plaguing me all week.  Then when I finally got to spin it up the epoxy on the rotor failed, and caused the magnets to crash into the stator.  Here is the video of the test.
The inside diameter of the rotor magnets and the outside diameter of the rotor body are the same diameter.  This means there is only  a very thin layer of epoxy holding them together.  The centrifugal forces on the magnets cause them to pull away from the rotor body.  When I spin the rotor up to 5000 RPM the forces on the magnets were enough to cause the epoxy to fail, and the magnet popped off of the rotor, and hit the stator.

I did, however, have a little time to run a test, which turned out good.  The alternator develops about 15.5 Volts open circuit.  I am using a 12 Volt 7 Amp hour battery to drive the motor.  So its a fixed speed for now.  I hooked up the output of the alternator to a 1 to 10 transformer.  The open circuit voltage coming out of the transformer is 151 volts.  Then the voltage drops to around 71 Volts when it is loaded with a 10 Watt, 120 Volt light bulb.  This test only lasted a few seconds before the rotor lost one of its magnets.
Earlier in the week I had built a speed controller board to vary the speed of the motor.  It is a Voltage regulator with a power transistor to allow me to use a potentiometer to change the voltage applied to the motor.  Here is the schematic.
I am planning to use a bank of D size batteries to be my power source.  I have had these batteries and battery holder for years, and used them for many other projects.  So I had some dead batteries, and some weak batteries that contributed to my troubles.  Then when I had those problems solved, I found that the D cell batteries really don't have enough current to get the motor going when I use the speed control board.
So, I wound up using a sealed lead acid battery which develops more current, but is probably still deficient for running the motor.  With just a few minutes of testing the battery Voltage was starting to droop.  I think I am going to have to get a bench top power supply, so I don't have the current deficiency problems.
So, despite a menagerie of problems, I think this test went well.  I need to get my rotor problems worked out, then I can start doing some current and power measurements and figure out what the DiaMag8 alternator is capable of doing.

Pork and Green Chile Sushi

Tex-Asian fusion cooking is one of my favorites.  Here I am going to take some of my hardwood smoked pork and roll it into sushi with some green chiles.  What got me thinking about pork and green chile is something that I used to get at Poncho's, which is Green Chile Stew.  Obviously the stew is not going to work inside of sushi, so we'll use the star ingredients of the stew in the sushi.  We'll start with some Jasmine Rice.
Make sure you wash the rice thoroughly before cooking it, otherwise it will be too sticky.  Washing the rice removes some of the gluten, which is what makes the rice sticky.  While the rice is cooking I'll prepare some of the items that will go into the sushi rolls.
I had smoked this pork earlier in the week, and its good by itself, but I want to give it a little Asian flair.  To do this I will apply some Teriyaki sauce.  Also we want to slice the pork into pieces that work in the sushi.
 I'll put the pork in a cool oven, about 225 degrees Fahrenheit, to warm it up and let the Teriyaki get into the Pork.
When the rice is done cooking we will add some rice wine vinegar, aerate, and cool the rice so we can handle it with our hands to make the sushi rolls.
Now for the green chiles.  I am going to chargrill the chiles.  I had started this with a torch, but it kept going out, so would up using the gas grill.
What you want to do with the Chiles is to blacked the skin.  As the flames work on the Chiles the skin will bluster and turn black.  They need to be turned often and cook really fast with open fire.

After they are blackened we'll put them in a plastic sack, and seal it to let the steam from the Chiles loosen and rehydrate the skin.  Then we will peel the skin off the Chiles, clean out the seeds, remove the Calyx, and finally slice them into strips for the Sushi.
I also sliced some Cucumbers to get a little crunch in the Sushi.  This is where you have creative license.  You can really put anything into Sushi, like black beans, or scrambled eggs.
OK, now we have the vegetables prepared, and the Pork prepared, and the Rice prepared so we can get to the rolling part.  You don't actually need a Sushi rolling mat, but it does help.  This one was about $2 at the local Asian market.  You will also need Nori paper.  Nori paper is Algae, which is formed into sheets and dehydrated.  Nori is extremely nutritious.
So, first put the mat down, and the Nori paper, and apply the rice to the Nori paper.  You sort of have to make the Rice stick to the Nori.  It helps to keep your fingers moist when working with the Sushi Rice.  It help to prevent the Rice from sticking to and globbing up on your fingers.  Also leave about an inch of Nori at the top so that you can seal the roll.
After adding the rice we'll add the Cucumber, and the green Chile.  Here at this point you can add seasoning, and or other flavors.  Some people add Wasabi, or Pickled Ginger inside the Sushi, while I will leave those on the side.
Next we'll add the pork.  You don't want to add too much inside the Sushi because you will have trouble rolling it.  If you need more, make more rolls.
Use the Sushi mat to roll up the Sushi applying pressure to the roll to make it tight.  Apply some water to the exposed Nori we left on the top, and press it against to outside of the Nori to seal it.
Then more the whole roll over to the cutting board to slice it into pieces.  If you wet the knife, and keep it clean of rice, it will slice easier than if you are using a dry knife.  I serve the Pork and Green Chile Sushi with a some Wasabi paste, and pickled Ginger on the side, with Soy Sauce.