Friday, April 25, 2014

Spring Garden 2014

Here we go again, Springtime, Mo tilling required.  This year I found Bhut Jolokia plants at Rosemeade Market, and I got a few.  They also had some Heirloom Tomatoes.  My Beans, Peas, and Cucumbers are sprouting along the fence where I installed welded wire to act as a trellis for climbing plants.
I had tried to sprout come Tomatoes, and Chiles from seed this year, and while they did sprout, paled in comparison to the expertly sprouted plants from Ruibals at Rosemeade Market.  But, they didn't have all the varieties that I wanted, so I wound up getting Habaneros, and Cayenne Chiles from another place.
This year the planting boxes have been removed, the fence is built, and I can concentrate on the garden.  I stored a massive heap of composted yard scraps for amending the soil, and mulching.  Over the past month I been pulling weeds, and tilling the areas where I wanted to place the new vegetables.
Here at the South end I have the Better Bush II, and Heirloom Tomatoes, along with the Serrano Chiles.
Then there is a patch of Herbs.  I have three varieties of Sage, Rosemary, Lavender, Cilantro, and Parsley.
This is the Hot Chile patch with the Bhut Jolokias, Habaneros, and Cayenne Chiles.  Mui Caliente...
This Crucifer Patch has Cabbage right now, but as it gets warmer I plan on harvesting the Cabbage and planting Daikon Radishes here.  Crucifers do better in cool weather, then later I have space for other things.
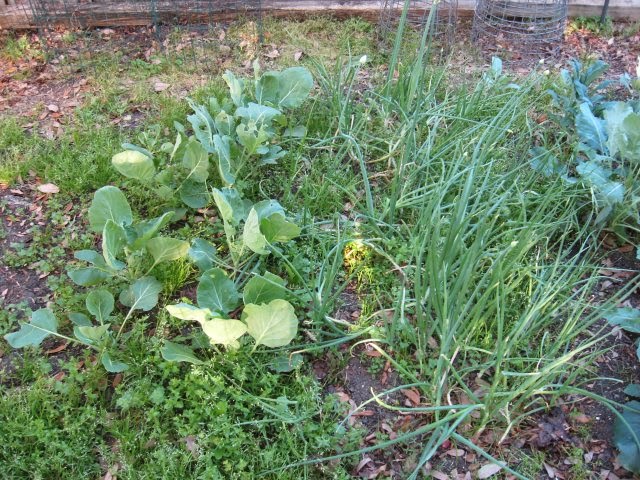
Then this is the end of the Crucifer patch with Brussels Sprouts.  The Green Onions are here also because they grow best in cool weather, then as they get harvested I'll plant something else that does well in the heat.
Next I need to put in the Tomato cages, pull more weeds, and finish spreading the mulch around.  In a few weeks it will start looking like my garden should.  The Sage is probably the best looking right now with its purple blossoms.  I am already harvesting some things like Kale leaves, and green Onions.  I am really looking forward to trying the Heirloom Tomatoes.  Shouldn't be long now...

Saturday, March 29, 2014

Sour Giardiniera

Giardiniera is a Italian Relish which is literally the end of the Harvest which is pickled for the Winter months.  Everything that is left at the end of the growing season goes into pickle jars, and get preserved for times when fresh vegetables are not available.  So we have some of this, and some of that, throw in some hot Chiles, and spices, then let them fermet until they are nomlishious.
Modern versions of Giardiniera are pickled are sterilized using the Acetic Acid Pasteurization process that is so popular right now, and that is a real pity.  So much is lost in the sterilization of these vegetables, the plant enzymes, the vitamins, and even the fiber is cooked until its useless.  I aim to change this.  So, I'm making Giardiniera with the Lactic Acid Fermentation process.  Preserve those Plant Enzymes, protect the Vitamins, and Fiber so that its nutrition can be transferred into our bodies, and not cooked off.
It is likely that the origins of the Lactic Acid Fermentation of Vegetation began at the sea.  Primitive man, knowing that Winter was coming, would take the end of the Harvest, pack it into some sort of vessel, cover it with Sea Water, and store it in a cool place, like a cave, or a hole in the ground.  I have encountered many stories like this concerning Sauerkraut, Kimchi, and Pickles.  The Lactic Acid Fermentation food preservation process is likely as old as the human race, and perhaps older with other species.  The Salinity of seawater around 3.5%, which is perfect for a light brine.  Mine is 5% Salinity because I am being cautious, and don't want to accidentally start a bacterial infection, and make myself sick.  But, so far, I haven't had any ill effects.  In fact my fermented pickles make me feel better, and my stomach is happy.
The Classic Giardiniera has Cauliflower, Carrots, Celery, Sweet Chile (Bell Peppers), and Hot Chile, as well as a menagerie of spices.  It is mainly used as a garnish for sandwiches today, and here is where I am going to deviate.  I want something more like vegetable pickles, big pieces that can be used more like a side dish, rather than a garnish.
Here the Giardiniera has been fermenting on the counter top for almost a week.  The brine is developing the  cloudiness characteristic of the Lactobacilli culture which means the fermentation process is proceeding well.  The aroma of the Giardiniera is wonderful.  You can smell the vegetables, and spices clearly.  I am going to wait until the fermentation has been going for a week before I try them.  Then I'll put lids on the bottles, and put them in the refrigerator to calm the Lactobacilli, and let them age for a while.  Trying to be patient, aand waiting for Sunday to try them...

Thursday, March 20, 2014

Sour Pickle

I tried one of my Sour Pickles last night.  They are about two weeks old.  They are crisp, not mushy, and have picked up the pickling spices well.  They are a little salty, but that is OK.  Look at the color, nearly perfect.  This is what a pickle should be, crisp, never cooked like those Claussen Pickles.  The only draw back is the brine is still a little cloudy, which makes me think that the store bought pickles are Lacto-Fermented in brine, and then bottled in a fresh, or clarified brine.  The Okra Sour Pickles are really good too...

Friday, March 14, 2014

Okra Sour Pickles

I was at Rosemeade market last Saturday, and noticed they had a new crop of fresh Okra from South Texas.  I love pickled Okra, and now is the opportunity to make Okra Sour Pickles.  So I bought 1.5 pounds of fresh Okra, and 1.5 pounds of small pickling Cucumbers.  The brine I make is roughly 5% salinity, and to make it boil 1.5 Quarts of Vitalized Water, and added 4.5 tablespoons of Sea Salt.  Then let the brine come back down to room temperature.  This is important because we do not want to cook the Okra, or Cucumbers.
This time I am using over the counter Pickling Spice, Garlic, and one dried Cayenne Chile per half gallon bottle.  I'm going for a milder more familiar taste in the pickles this time.  Some of my previous batches I have made way too hot, even for me, so I am concentrating on getting more of a pickle flavor this time.
I added about a palmfull of the pickling spice to each jar, one crushed Garlic clove, and one whole dry Cayenne Chile to each jar.  Wash the Okra, and Cucumbers thoroughly.  The Okra goes in whole, and I trim the ends off of the Cucumbers to expedite osmosis in the Cucumbers.  Then we'll cover them with brine, and weigh the veggies down with some clean, smaller bottles with tap water in them.  Remember this is a Lacto-Fermentation process, so you don't need to be nutso about sterilizing everything, just make it clean.  The Brine and the Lactobacilli will keep the process under control.  Keep Calm, Lactobacilli know best...
Here is where this process gets exciting.  These bottles will sit on the counter top, at about 70 F for 5 days to start the Lacto-Fermentation process.  This is where the Lactobacilli culture starts and produces the Lactic Acid that make the pickles sour.  You want the culture to thrive first, the calm it down with refrigeration.  An interesting thing happens here.  You can actually see the culture working.  The brine will develop a cloudiness, and this is the Lactobacilli working their magic.  Then when the culture reaches the target acidity we'll put the jars in the refrigerator to temper the Brine.  What happens is the Lactobacilli will go dormant (goto sleep) and settle to the bottom of the jar, leaving a clear brine.  The Lactic Acid will continue working to pickle the Okra, and Cucumbers transforming them into Sour Pickles.  Now we'll let the pickles sit for another couple weeks to finish them.  The vegetables are still alive at the end of this process, and have not been cooked.  The brine is teeming with Lactobacilli life, these are living Pickles, and are a thousand times better than anything produced in a acid cooking process.  Damn I'm hungry again...

Wednesday, March 5, 2014

Baby Tomatoes 2

There was one night about a week ago where the temperature dropped below freezing, and I lost a few of the Baby Tomatoes.  Then last Sunday we got Thundersleet, which is a thunderstorm coupled with freezing conditions, and you get frozen rain, not good for Baby Tomatoes.  So, I moved all my annual sprouts to the kitchen table.  The Thundersleet is pretty to look at, but it makes gardening tricky.
There are also hundreds of sprouts in the garden that I can't move.  Those will hopefully be alright, most are cold tolerant species that can take a mild freeze.  The temperature went down to around 15 F, so I may be replanting some of them.  Also, while I was working on the Annual sprouts I decided to plant some Habaneros as well.  I found some good looking specimens while grocery shopping this week.
This morning I was watering all the annuals, and noticed that I have a couple Jalapeno sprouts.  All of my annual seeds are harvested from fruit I bought at Rosemeade Market, or other food stores, and not seed distributors.  So far that is Tomatoes, Jalapenos, and Habaneros.  Altogether there are about 11 Tomatoes sprouts, and two Jalapeno sprouts so far.
Then I needed to get some light to them.  I thought about using the window boxes on the south side of the house, but they are relatively cold.  To get chile seeds to sprout they need to be warm, especially Habaneros.
So I setup a florescent lamp on the kitchen table.  The kitchen is probably the warmest room in the house.  Hopefully within a week we'll have more spring like temperatures, and I can move my annual sprouts back to the greenhouse where they get real sun.

Sunday, February 16, 2014

Baby Tomatoes

I've been growing Tomatoes for around 15 years.  Spent a long time observing Tomato behavior.  There are a lot of Tomatoes around, sometimes for long periods of time.  When a Tomato has been ripe for a long time, several weeks, and is exposed to the right conditions, it's seeds will sprout, and begin growing inside the Tomato.  This one has been sitting in a South facing Kitchen window for a few weeks.
The temperature is around 70F all the time, and the window gets sun from mid to late afternoon.  So the conditions are good for seed germination.  You will first notice dark bumps under the skin of the Tomato.  Then the dark bumps move slowly, as the stem of the baby Tomatoes pushes the first leaves, the dark bump, outward.  At this point the Baby Tomatoes are breaking out of their egg.
I used a sharp knife to remove the skin, exposing the Baby Tomatoes.  The seed cavities are beneath the meat of the Tomato, and the sprouts have grown through the meat.  Next I'll tear the Tomato meat apart to extract the Baby Tomatoes being very careful not to damage the sprouts.
This Tomato yielded about 35 sprouts.  The green end is the first leaves, the dark bumps.  The red end is the albumen, analogous to an egg white, which is a nutrient sack meant to feed the young seedling until it can be planted in the ground.  I really expected to break more of the sprouts believing they would be more feeble, but they have that sprout zeal, and I only broke a couple.

 I prepared some cups with some potting soil for the Baby Tomatoes.  The cups are mostly full.  Carefully set the Baby Tomatoes on top of the soil, and cover with another quarter inch of the same soil.  The bottom of the cups have been pierced for drainage.
Then the cups will go in the South facing greenhouse window.  They will get good light from mid morning to mid afternoon.  The leaves should emerge from the soil in a couple days.  It will be about a month before I can plant them in the ground, and I think that should be enough time for them to get a good root base.
The next morning I thought I might as well start some Jalapenos as well.  There is a ripe Jalapeno in the Kitchen window, got cups, got soil, but these seeds aren't sprouted.  Otherwise its the same as with the Baby Tomatoes.  Pierce the bottom of the cups.  Fill them with soil.  Add a few Jalapeno seeds.  Cover with a small amount of the same soil, and water.
Last night I had some critter get into one of the Baby Tomato cups, and tump it over.  I added a rail to help keep the cups upright when curious critters are nosing around.  So it looks like my Summer Annuals are started.  I need to find some other plants to start like this.  Habaneros...

Friday, February 14, 2014

Winter Garden 2

Its been about a month since I planted seeds in the Winter Garden.  There are little sprouts in those areas.  Most of them are Crucifers, so all their sprouts look alike.  We finally had a couple warm days here where I can get out there, pull weeds, and plant some more early Spring vegetables.
This time I added some white and red Onions, green and purple Kohlrabi, Lacinato Kale, more green Cabbage, and Brussels Sprouts.  I've been using my compost from last year to cover mud spots, as I pull weeds, then the compost gets tilled in to improve the soil, and covered again.  Places where there are sprouts are just bare soil right now.  As the plants get bigger I will mulch around them.
This is the South side of the greenhouse.  This area is next to get cleaned up.  Here I have Rosemary, Oregano, and Thyme, which are all Evergreens.  In the middle of the long box is Tarragon, which is perennial, and it will start to grow in about a month when there is more light and warmth.
This is the view from the North side of the greenhouse.  In the middle are Sage, Rosemary, and Lavender, also Evergreens.  There are some Turnips that lasted through the Winter, but they don't look very good.  The greatest amount of green here are weeds, especially Clover.  I had sprinkled Carrot seeds all over the place and there are a lot of Carrots. These Winter Vegetables will mature and get picked around the time I plant Tomatoes, and Chiles in mid to late March.  As soon as the threat of frost is passed it is time to plant the Summer Annuals.  That is when I will do a deep Till, add plenty of compost to the soil, and supplement with Yum Yum Mix, an organic fertilizer.