Pages

Sunday, December 27, 2020

Chilaquiles with Wagyu Beef Chili

 Chilaquiles are called Migas by Gringos.  Itz not a Migas, iz Chilaquiles...  They are informal enchiladas.  A formal Enchilada has a nice, fresh Tortilla that is rolled.  Chilaquiles use the leftover bits.  Nachos are even more formal than Chilaquiles.  Nachos are usually Round, or Triangular Tortilla chips that are uniform.  You want the best, freshest Tortilla chips for the Nachos.  Chilaquiles are different.  Chilaquiles are made with the leftover scraps.  Those little bits of Tortilla chips leftover at the bottom of the bag.  To us Texicans, some of the best food is the leftover bits that no one else wants which makes it dirt cheap.

You want to start with a little too much butter in a pan to fry the Tortilla bitz...

Then dump in the Tortilla flotsam, you know, the little leftover bitz from the bottom of the Tortilla Chip bag.

Let the Tortilla flotsam fry for a while, then dump in some Eggs.


 This is like a Country Scramble.  Put the Eggs in whole, let them set up a little, then knock them around.

Then dump in some cheeze.  Whatever you have.  This is Cheddar, but it can be whatever is leftover.

Then knock that around a while, and itz Chilaquiles.  Nomlishous.

Then I load them on a plate, add a side of my Wagyu Beef Chili, then Nom Nom Nom...

Harley says Om Nom Nom Nom...  I think that those are his favorite words...


Saturday, December 26, 2020

Wagyu Beef Chili off the cuff

 OK, here we go...  Sick of making holiday food...  Sick of eating holiday food...  I'm launching into the New Year with Wagyu Beef.  Wagyu Beef is American Kobe Beef, like in Japan.  You will pay an enormous sum of money for a Kobe Steak, here or in Japan.  Well this is locally raised, and mass raised Wagyu Beef, right here in the Southwestern United States, and it is not nearly as expensive.  I've tried it as Cheezeburgers, and it's great.  So, lets make Chili with it...

It's ground beef, so we are going to treat it like normal Chili.  There is a slightly higher fat content.
As we are browning the Wagyu Beef I will season it liberally with the salt shaker, and add diced onions.

As it close to browned I'll add some diced Garlic, and keep seasoning with the salt shaker.

Next dump in some diced Tomatoes.  Typically I would add some diced green Chile as well.

You gotta has some Masa in the Chili, so this time I am using yellow Corn Tortillas.

Then add the spicy dry ingredients.  This is my usual Chili Spice Mix, Carroll Shelby's.  And a little more Red Chile Flakes.  I omitted the Green Chile, so gotta haz a little more Red Chile...

Next I add some Tomato Sauce, and a little water.  Keep tasting, and seasoning, gotta get the salinity right.


The final thing is Beer.  Then we'll let this simmer down for a while.  The Alcohol in the Beer brings the Nightshade Plant Flavors out, like the Tomato, and the Chile.  Chili absolutely has to have Chile, Tomato, Masa, and Beer.  It just doesn't taste correct without those ingredients.  We'll let it simmer down for a couple hours, and then have a Fiesta...  Viva la Wagyu Beef Chili...


Guerilla Astrophotography 4

 I am trying a different eyepiece now.  This is 9mm Orion Sirius Plossi.  Greater magnification, and a smaller aperture make this much more difficult.  The telescope is 1200mm focal length, and now I am using a 9mm ocular lens, so the magnification is 133.33x.  Almost too much.  Then I have the 4x zoom with the Power Shot A560.  Potentially 533.33x magnification, but that is outside of the theoretical specification of the telescope, so not going there.  It's a nice shot though at 133x magnification...

Keep in mind that the aperture of the lens is limiting my field of view.  Also the periphery of the image is not the edge of the Moon, and you are seeing a small portion of the Moon.  It is not focused perfectly, but it is the best image I got with the 9mm Plossi.  This is considerably more challenging than using the 25mm Plossi.  I have a 30mm Plossi, with a 2 inch mount, which is an exceptionally beautiful lens, but my SteadyPix Pro camera mount doesn't fit on it.  The SteadyPix Pro adapts to a 1.25 inch mount.  I've done some handheld shots with my phone on the 30mm Plossi, but have a hardtime acquiring an image that way.  I would much rather use the SteadyPix Pro to hold the camera.  So, yeah, I think this is progressing positively.  I think I would have much more fun with a Canon EOS 5DS with a 40 megapixel sensor.  You know, it's only $1500 for just the camera body...

Just found out the new Canon EOS 5DS has a 50.6 megapixel sensor, and is more like $2000...  Well, OK, that'll do...

https://www.usa.canon.com/internet/portal/us/home/products/details/cameras/eos-dslr-and-mirrorless-cameras/dslr/eos-5ds


Friday, December 25, 2020

Guerilla Astrophotography 3

 Starting to play with the optical zoom of the camera in combination with the telescopes magnification.  This is maybe one of the best shots I have ever got of the moon.  I'm going to look at Orion, M42, and Pleiades next...


Guerilla Astrophotography 2

 I've finally got a chance to play with my new (old) astrophotography setup.  I've been studying the stacking software, and it uses an AVI file for the source images.  It turns out that my little Canon Power Shot A560 produces AVI files.  What a nice coincidence.  Actually I think that is a standard, and I didn't know about it.  So I have a nice clear, cool evening, and the Moon is high, lets take some shots.

The Power Shot A560 has a 7.1 megapixel sensor.  Well by today's standards it is kinda small, but seems to do really well.  Playing with it tonight I found that I had to push the camera's lens in really close to the telescope eyepiece.  I'm using a 25mm Orion Sirius Plossi eyepiece.  The telescope is 1200mm focal length divided by the 25mm ocular lens gives us 48x magnification.  Then I get another 4x optical magnification from the Power Shot A560, so theoretically I can get 192x magnification from the complete system.  The shot of the Moon above is at 48x magnification.

I had this idea in my head that I needed an eyepiece camera for Christmas.  After letting that stew in my brain for several weeks I came to the conclusion that I could do this without spending several hundred dollars on an eyepiece camera, or several thousand dollars on a new Canon EOS.  Just back up, look at what you already have, and then figure out how to make a system work.  I'm kinda impressed I was able to do this without spending a lot of money.

Something else I have noticed is how dirty my camera, and telescope are, LOL!  The Camera is around 12 years old, and the telescope is about 3 years old.  I did clean the telescope about 2 weeks ago, but from this shot I can tell it's getting dusty again.  I guess it's time to scrub it down again.  If you look carefully at this last shot you can see a couple dog hairs too, LOL!  Thatz Harley, his fur covers everything I own...


Thursday, December 10, 2020

Guerilla Astrophotography

 Sure I'd like to have a Canon EOS with a 20 megapixel sensor, but, you know, I don't have the scratch to make it happen.  No worries, I do have yesterday's technologies at my disposal.  I have used my phone to take astrographs, and it works fairly well, but I have been manually holding my phone in front of the eyepiece, and it is tedious getting a decent shot.  Well, look at this...

This eyepiece adapter is called SteadyPix Pro from Orion Telescope.  There have always been various telescope eyepiece adapters available for telescopes for cameras that have detachable lenses.  That makes it much easier when you can remove the lens of the camera, and then directly attach the camera to the telescope eyepiece.  I do have a 35mm Nikon F1 camera that I can do this with.  But...  It is a Film Camera, and doesn't really suit my vagabond shooting style where I post shots directly to the interwebz...


Another aspect of having a general purpose camera on the eyepiece of the telescope is that it drastically reduces the amount of equipment that I have to move around when I want to do astrophotography.  The NexImage 5 Eyepiece Camera from Celestron is a Great Sensor, but it requires support equipment.  You need to bring a computer, and cables, and a power supply.  While this might not seem like much, it consumes the time that you have available to take astrographs.  The SteadyPix Pro, and a cheap general purpose camera will allow you to take astrographs, and view them right at the telescope eyepiece.  It streamlines the process, and saves time when you want to be shooting the sky, and not setting up the computer, or troubleshooting cabling.


The camera that I am using is the Canon PowerShot A560, which we bought back in 2008.  Sure, kinda old, but its image sensor is still bigger than the NexImage 5 at 7.1 megapixel.  OK, now I go snap some shots...


Friday, November 27, 2020

Cherry Smoked Turkey and Fixinz

 The forth Thursday in November is Culinary Nirvana.  Chefs spend months thinking about this one day, and how to make it perfectly sublime.  We want to Wow! everyone, and make them say "This is the Best meal I have ever had."  Sure, not so easy for the Chef, but everyone delights with the creation of the Perfect Thanksgiving Meal...

Well, you gotta haz The Big Bird.  Not really the biggest, just big.  Turkeys are ambiguous, overbreeded specifically for Thanksgiving.  Turkeys probably outnumber humans.  I know Chickens do.  That is because they are delicious.  Om nom nom nom...  So there are some very specific, and deliberate things you have to do to "The Big Bird" to make it Thanksgiving savvy.  Brine, uh...  Salt Water...  Very Important!  Smoke...  Even more Important...  Culinary skills are perhaps the apex of importance.  To take a raw Turkey to "The Best Thing I have ever ate" takes skills, and not easily acquired skills.  I have around three and a half decades invested in what I do...

One of the accolades I enjoy is Gravy.  The Turkey concurs...  You must make Gravy...  My process includes the acquisition of Turkey Fat.  It is a quintessential element of Thanksgiving Gravy...  Thanksgiving cannot proceed with out it...  Traditionally there is Giblet Gravy.  Well, over time I think I like Mushroom Gravy better.  So this year it is Mushroom Gravy.  It still has the Turkey Dripping from baking the Turkey at a low temperature before we smoke it.  This year I baked the Turkey at 350F for around an hour, then reduced the temperature to 225F overnight, around 6 hours.  This let the Turkey come up to temperature over a long period of time, rendering the fats necessary to make Gravy.  Then in the morning I built a Cherry Wood Fire, and smoked the Turkey for around an hour.


Then there is the Stuffing, er, uh, Dressing, also a Thanksgiving Ubiquity...  You Must Have Stuffing (Dressing)!  It is a unwritten rule...  It just haz to be there...  If you at the Fanny Farmer Cookbook, specifically at Cornbread Stuffing, there is a 50/50 mix of Bread, and Cornbread.  OK, yea, I live in Texas, and we know Cornbread Stuffing...  Mix up a batch of Jiffy Cornbread (Denton, Texas), and bake it off.  Let it sit for a day, and then dice it up.  Get some nice rustic sourdough, and dice it up.  Saute some Celery, Onions, and Mushrooms in Butter, then throw in the Breads, some Herbs (Weed), and some Chicken Stock.  Load them into a Pan, and bake it off at 350F for 20 minutes.  The combination of the Cherry Smoked Turkey, Cornbread Stuffing, and Mushroom Gravy is almost perfect.


The last, perhaps most important thing, is the Cranberries.  The perfect Thanksgiving has to have this Sweet Tart addition.  This is a contrastural addition to the Thanksgiving Dinner.  Everything that we have made before this has been Savory.  We need this Sweet Tart contrast to smack your palette to the other end of the spectrum every once in a while.  This resets your palette, and when you go back to savory it is really delicious again.  It is Umami, but in a Uniquely American Way...  Trust The Plan...  Patriots are in control...  and...  Bon Apetit ala Americana...


Friday, November 13, 2020

Friday the 13th Crescent Moon

 Today has some interesting astronomical phenomena to be seen.  One day before the New Moon, on Friday the 13th we have a conjunction of Mercury, Venus, and this nice Crescent Moon.  Also, Mars is going direct today.  It is interesting both astronomically, and astrologically.  This should make for an interesting day...  LOL!


Sunday, September 27, 2020

Beef Lo Mein

 I've been playing with Asian Spices again.  That and the Beefz.  Cherry wood smoked Beefz.  Homemade noodles are always better than take out.  This one is Beef, Mushroom, and Onion...

Lets look at the Beefz first.  I am not starting with raw meat.  My Grill was down when I made this so I used the Smoker.  I don't usually smoke steaks. but it was the only option this time.  This was a couple Chuck Steaks that I seasoned with my usual rub, Tony Chachere's, and Black Pepper.  Then they hung out in the Cherry Wood smoke for around an hour.

This is the next day after I prepared the Beefz, and they are cold.  This helps to make nice thin slices.  Then we need some Beef compatible vegetables.  My favorite are Mushrooms, and Onions chopped into large pieces.

This is an Asian flavored preparation, but I am still going to start with butter, and not oil.  It's a country boy thing.  Also I am using Extra Wide Egg Noodles instead of Lo Mein Noodles.  I don't like messing around with noodles that are too long.


Once the vegetation softens up, and the Egg Noodles are cooked I'll add the Beefz into the pan with the vegetation to warm it up.  Then dump in the Egg Noodles and mix them up.  The last thing is the Asian flavor.  This time I have used Soy Sauce, and toasted Sesame Seed Oil.  Itz Nomz Time...


Sunday, August 2, 2020

August Barbeque

Wow, it's a nice day out there.  Really mild for August in Texas, low 90s.  It makes me want to play with Fire!  Apple Wood Smoke specifically.  I found some Pork Shoulder cuts at the grocery store today, and Apple Wood Smoke seems like the right way to cook them right now.
I am simplistic with the seasoning so that the smoke flavor can stand out.  All of this drives Harley krazy.  He's been waiting for the Barbeque for many hours, and getting restless about it.  I like a fairly light smoking of the Pork, and I'll keep it in the smoke for two or three hours.
Also I like to use cuts of the Pork Shoulder Roast, and not the whole Pork Shoulder, sometimes called a Boston Butt, or Pork Butt.  The reason I use cuts is to get more surface area to season, and smoke the Pork.  Better flavor penetration is the whole idea.  Then after smoking I put the Pork in the Crock Pot for several hours.
At this point the flavor is delivered, but now we need to use slow, and steady heat to breakdown the connective tissue in the pork.  This gives the correct texture to the meat, and when it is done it will be like Pulled Pork.  Finishing in the Crock Pot also produces Au Ju, the meat juices, which I will then add to the Beans I have prepared separately.  This is Sunday Nomnomz...
 Once all the cooking is done I package the Pork and Beans in 12 oz. containers, and label them with both the preparation date, and the expiration date.  This is a little side business that has earned a formidable reputation where I work.  I have people asking about when I am going to start cooking again.  Well, I guess now is the right answer...

Saturday, July 18, 2020

Charlie Brown Christmas Tree...


We had one of our Bradford Pear Trees die this year. Over the past few weeks we had the dead tree removed. Then, last Thursday, we had the stump ground down. So, I had a big pile of mulch in the front yard, and needed to do something with it. Hmm, well I do have a potted Pine Tree in the back yard. Lets see what we can do with a big pot, a pile of mulch, a pile of clay soil from a post hole, a bunch of stones, and a small Pine Tree...
 and the pile of mulch...

Sunday, July 12, 2020

Greenhouse Stub Fence

I've been working on a way to seal the south end of the garden from my little garden glutton.  Given the opportunity Harley will eat everything in the garden.  Yes he is just a walking stomach.  Previously I had an impromptu piece of wood blocking the north side of the greenhouse to the garden.  Well, that wasn't really a good solution, and it was deteriorating.  So, I had a need to replace it, and also one of the fence posts broke adjacent to the spot I wanted to add this stub fence.
Above is the finished stub fence.  Below is where I started.  On the right there is a broken post on the outer fence.  Need to fix that, but also wanted to tie the outer fence into the greenhouse frame to make this stub fence.  The greenhouse has been in this state for about seven years.  It is time to do some renovation.
I cleaned out the greenhouse several weeks ago, and that gave me some ideas about where I wanted to go with it.  At first this was a legitimate greenhouse that I used to start plants.  Then I kept building on it, and the Trumpet Vine grew over it, so it wasn't as useful as a greenhouse.  Then it was repurposed to overwinter plants.  Well, it wasn't sealed very well, and the heater broke, so it failed that mission.  After that it became sort of a garden shed for the power equipment, and garden tools.
So, first I need a new post for the outer fence.  This is a regular thing for me.  The outer fence was built with Cedar posts, and they just don't last very long.  So, when they break I replace them with Pressure Treated Pine Posts.  Also, I use two posts per panel in the middle of the runners instead of at the ends.  This doubles the strength of the fence.
Post holes are tough to dig in this Texas Clay Soil, and it is oppressively hot during the day, so I've been digging my post holes at night.  I did this one at about 10 PM.  It's still hot, but not beat you down, and burn you to a cinder hot.  Also I have added a 2x4 support beam on the greenhouse to support the runners that hold the slats.
Previously I had tried to seal the greenhouse for overwintering plants.  Well, that didn't work too well.  So, now I am going for a flow through design to let the air freely circulate through the greenhouse.  This involves removing that materials that I had previously used to seal the greenhouse.  I've pulled the slats off the sides of the greenhouse to remove the plastic sheeting, and I'll replace the slats with an air gap between them.
Then, finally, the white door has to go.  It was another attempt to seal the greenhouse.  Again, didn't work very well.  I am going to replace it with a gate type half door that can be folded back against the greenhouse on the right.  After cleaning all of this up the last thing to do is to put the slats back on.  This has been a neat project over the last week.  Now I got to hit that Trumpet Vine again...

Monday, June 15, 2020

Saured Kraut

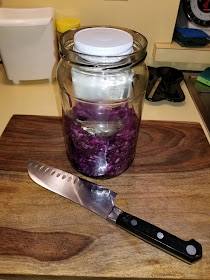
This is the Red Sauerkraut after 6 days.  It is starting to get that "Kraut" smell which I sense as Chlorine Dioxide.  It has a very chlorinated smell.  This may be why Cabbage is a Super Food, possibly a Super Healing Food because it outgasses Chlorine Dioxide.  Cruciferous Vegetables are known to have super health enhancing properties, and maybe also some healing benefits, but what if it is more.  What if Sauerkraut can kill viruses?  I know that the Lactobacillus Acidophilos will take over a culture, and kill off all other inoculations.  What if it also kills off viruses?  I don't know but, I do know that eating Sauerkraut gives me Mega-Energy, and makes me feel like a Super Hero...

Tuesday, June 9, 2020

Red Sauerkraut

Craving Fermented Food, and I had a head of Red Cabbage.  Hmmm...  Red Sauerkraut?  I have a book called Wild Fermentation that covers all sorts of fermented foods.  Kimchi is one that I like, and made a few times.  Giardiniera is another that I have made which contains a medley of vegetables.
The Red Sauerkraut is much simpler that either the Kimchi, or the Giardinera.  You basically chop the Cabbage, put salt on it, then wait for it to sweat, pack it in a jar, and let it sit around for a while.
It is a little more complex than that, but not much.  You have to take some precautions to keep it submerged.  Also you have to punch it down after you salt it.  Kind of beat it up to hasten the osmosis process that makes the brine.  You have to come back to periodically, and beat it a little with a muddle to encourage the osmosis which pulls the water out of the cabbage to form the brine.  You also need to monitor the water level, and keep it above the cabbage.
It will take several days for the fermentation to kick it.  As it ferments you will see the color change, and brine will accumulate.  Just check it periodically, and punch it some more.Within a week it will start getting that sauerkraut taste.  It is edible already, so try it.  After three weeks, roughly, you can put it in the Fridge, to store it.  It will still ferment,  just a little slower, and get better.  After a few batches you will find a time where it is just right, and it's time to go to the Fridge.  I like simple food, but I think I want to make this one a little more complex, maybe by adding Beets, and Carrots.